Disclaimer: First, Almost material in this article I borrowed form all over the public web. Some of most borrowed source are (in order):
Second, This article only provides a way of step by step manually deployment of each jBPM-5.3.0.Final components. It was written by a jBPM beginner. For a official document please refer to: http://docs.jboss.org/jbpm/v5.3/userguide/
Third,this article example is in Linux. Mabe I will add ant scripts (again, heavily extracts from jbpm-install/build.xml) for faster deployment and Windows friendlier.
1. Overview of jBPM
jBPM Components
Download a copy of jbpm-5.3.0.Final-installer-full.zip (http://sourceforge.net/projects/jbpm/files/jBPM%205/jbpm-5.3.0.Final/) and extract it to a location, from now on we call it JBPM_INSTALL. JBPM_INSTALL contains all core jBPM components.
Components
| File in JBPM_INSTALL/lib
| Description
|
|---|
| jbpm-runtime | jbpm-5.3.0.Final-bin.zip | jBPM Runtime, if you are willing to build a stand alone Java application you will need this. |
| drools-guvnor | guvnor-distribution-wars-5.4.0-20120516.war | Drools-Guvnor provides process repository. |
| designer | designer-2.2.Final-jboss7.war | JBPM2 process designer. It's integrated with drools-guvnor. |
| form-builder | jbpm-5.3.0.Final-form-builder.war | Form builder. It's going to be integrated with the designer. http://blog.athico.com/2012/07/jbpm-form-builder-state-of-art.html |
| gwt-console and gwt-console-server | jbpm-5.3.0.Final-gwt-console.zip |
|
| human-task | jbpm-5.3.0.Final-human-task-war.zip |
|
Table 01: jBPM.5.3.0.Final components and their binary file
https://community.jboss.org/servlet/JiveServlet/downloadImage/19247/jBPM+-+Internal+Components+Communication.png
Figure 01: jBPM-Internal components communication
The communication between component as described in Figure-01, this article use MySQL. But by default, jbpm-install with "ant start.demo" will run with H2 database. From this communication view we can separate each component deployment. Event on each application server.
https://community.jboss.org/servlet/JiveServlet/downloadImage/19248/jBPM+-+Eclipse+and+Reporting+Communication.png
Figure 02: The communication with Eclipse IDE
Separation deployment
For a beginner, with all jBPM components are twisted together:
- It's hard to tell which message of what components. When something go wrong, which one to focus, which one to just ignore.
- Need a way to check each component is up and running.
- Just a way to learn and experience with jBPM.
Purely from this experience and conclusion, this article will provides a manual installation of each jBPM-5.3.0.Final component.
2. Common bugs fix after jBPM-5.3.0.Final release
Building from source-code
As a beginner I occasionally meet this kind of error {userId parameter, no result, must be positive, hornetq remote ..}. Some are must apply the fix before you can go on further. The commits after jBPM-5.3.0.Final does fix the bug but also introduces incompatible with other jBPM.5.3.0.Final. So this part will describes how to checkout Original jBPM-5.3.0.Final release source code; find the Fixed patch and apply to your local branch.
For more detailed git document, please refer to other document. This article only using related git commands.
# For your local branche
git config --global user.name "Your Name"
git config --global user.email "your_email@addr.ess"
b. Clone jbpm repository from github.com
# We only need jbpm.git, because in version 5.3.0.Final all component on the same git repository.
git clone https://github.com/droolsjbpm/jbpm.git

# We have local git reposistory. We will call its directory path as jBPM_SRC
cd jbpm/
mvn clean install -U -Dfull -DskipTests
Optional: in "mvn clean install -U -Dfull -DskipTests" abover, We can add -nsu (no snapshot update) for faster build. Because we're only aware specific on 5.3.0.Final revision and its dependencies.
mvn clean install -U -Dfull -DskipTests -nsu
This command really takes a while, especially for the first time and your empty maven local repository.
c. Working with local repository
The jbpm is a typical maven parent project with multiple module. Two of theme {human-task; gwt-console} are parent project too. From now on, you can use your favorite IDE with JavaEE profile to work with this checked out repository, showing diff and applying patch. Otherwise you can using git command as following example:
# From your jBPM_SOURCE, show tags
git tag
The output will be something like this:
5.0-CR1
5.0.0
5.1.0.CR1
5.1.0.Final
5.1.0.M1
5.1.1.Final
5.1.2.Final
5.2.0.Final
5.2.1.Final
5.2.2.Final
5.3.0.CR1
5.3.0.Final
Switch to 5.3.0.Final revision tag.
Chose your local branch name, for example: update.after.5.3.0.final
git checkout 5.3.0.Final -b update.after.5.3.0.final
Result message
Switched to a new branch 'update.after.5.3.0.final'
View pre-history just before jBPM team released jBPM.5.3.0.Final
git log
Example output
***@***:~/Tutorial/jbpm$ git log
commit d7640b9c0ba87d771862e8534cc607ca0f4d1aff
Author: Toni Rikkola <toni@rikkola.net>
Date:   Mon May 14 13:25:30 2012 +0300

    change to 5.4.0.Final version

commit 88440fe1430170458981c2752192df2c64c83636
Author: Maciej Swiderski <mswiders@redhat.com>
Date:   Wed May 9 19:22:35 2012 +0200

    BZ820210 - Could not initialize stateful knowledge session: loader constraint violation when using HornetQ task service strategy

commit 80f940e2e860ac640a75114ab2780f6c2b7a865c
Author: salaboy <salaboy@gmail.com>
Date:   Wed May 9 15:04:54 2012 +0100

    - mvel workaround

...
Build your own jBPM.5.3.0.Final for the first time
mvn clean install -U -Dfull -DskipTests -nsu
Now you can working with your local git repository, update the 5.3.0.Final tag with the patch you need. All your commit will be stored on update.after.5.3.0.final branches.
Apply bug fix
Bug: Could not locate named parameter [userId]
Full message
java.lang.IllegalArgumentException: org.hibernate.QueryParameterException: could not locate named parameter [userId]
Community thread:
https://community.jboss.org/message/738335#738335
https://community.jboss.org/thread/200361
Fix commit: 4a47527163854b233cdb9599f54c9320e945a372
Bug: No result, or connection timeout
Message
java.lang.RuntimeException: Timeout : unable to retrieve results
Treatment: With this particular deployment {separating components deployment, using MySQL} I haven't meet this error yet.
Bug: Must be positive
Full message:
2011-07-18 18:46:35,546 [FATAL] Uncaught Exception:
java.lang.IllegalArgumentException:
must be positive
    at Unknown.cKb(Unknown source:0)
Fix: Not yet. (I think) this comes from GWT bug. GWT is the Google Web Toolkit that jBPM-Console are using. Just ignore it and continue with your work.
Bug: HornetQ binding only to local address.
There aren't any configuration for Human-Task-War to bind on particular address. And by default it only listen on local address so Gwt-Console-Server cannot connect to it. Our separating deployment needs Gwt-Console-Server to connect to Human-Task, so apply the change-set below:
Bug track link: https://issues.jboss.org/browse/JBPM-3720?page=com.atlassian.jira.plugin.system.issuetabpanels:all-tabpanel
Change set: https://source.jboss.org/changelog/jBPM?cs=e115680b023ce0747608625f0cd61665cd09df40
3. Manual jBPM components deployment
Environment
Check your JDK installation
# Check JAVA_HOME environment variable arcording to your operating system. In linux
echo $JAVA_HOME

# JDK Java version 1.6 or newer
java -version
Check apache maven
Download and installation instruction: http://maven.apache.org/download.html
# Check M2 and  M2_HOME environment variables acording to your operating system. In linux
echo $M2
echo $M2_HOME

# Check Apache Maven installation
mvn -version
Check apache ant
Download: http://ant.apache.org/bindownload.cgi and manual: http://ant.apache.org/manual/index.html
# Check ANT_HOME environment variables acording to  your operating system. In linux
echo $ANT_HOME

# And ANT_OPTS if it's nessessary. For example proxy configuration
echo $ANT_OPTS
-Dhttp.proxyHost=192.168.193.12 -Dhttp.proxyPort=3128

# Check Apache Ant installation
ant -version
Deployment parameters
Name
| Variables
| Example values |
|---|
| Jbpm-install | JBPM_INSTALL | /opt/download/jbpm-install |
| MySQL username/password and schema | MySQL_JBPM MySQL_TASK | jbpm,jbpmpassword and schema name is jbpm task,taskpassword and schema name is task |
| MySQL server IP/PORT | MySQL_IP:MySQL_PORT | 192.168.140.39:3306 |
| Group-01 components: {Drool-guvnor, Designer, Form-Builder} | GUVNOR_JBOSS GUVNOR_IP GUVNOR_HTTP_PORT GUVNOR_MANAGEMENT_PORT | /opt/guvnor_jboss 192.168.140.39 8080 9999 and 9990 |
| Group-02: Human-task | HUMAN_TASK_JBOSS HUMAN_TASK_IP HUMAN_TASK_HTTP_PORT HUMAN_TASK_MANAGEMENT_PORT HUMAN_TASK_PORT-OFFSET HORNETQ_PORT | /opt/human_task_jboss 192.168.140.39 8180 10099 and 10090 port-offset="100" 1234 (Don't use default value, because we want to know if this configuratio affect or not)
|
| Group-03: Gwt-Console and Gwt-Console-Server | CONSOLE_JBOSS CONSOLE_IP CONSOLE_HTTP_PORT CONSOLE_MANAGEMENT_POR CONSOLE_PORT_OFFSET | /opt/console_jboss 192.168.140.39 8280 10199 and 10190 port-offset="200" |
Table 02 - Deployment parameters
The "example value column" in Table 02 are values from a real deployment with all jboss instances running on the same machine. https://community.jboss.org/wiki/MultipleInstancesOfJBossAS7OnTheSameMachine (Approach#1)
MySQL database deployment (just verify).
Verify that you can connect and login to MySQL:
# From server HUMAN_TASK_IP to MySQL_IP:MySQL_PORT
mysql -h MySQL_IP -P MySQL_Port  -u MySQL_TASK -pMySQL_TASK_PASSWORD

# From server JBPM_IP to MYSQL_IP:MySQL_PORT
mysql -h MySQL_IP -P MySQL_Port  -u MySQL_JBPM -pMySQL_JBPM_PASSWORD

# Note: -P (capitalized) for port; and -p (lowercase) for password.
# No space between -p and MySQL_TASK_PASSWORD. For example:
#   mysql -h 192.168.140.39 -P 3306 -u task -ptaskpassword
#   mysql -h 192.168.140.39 -P 3306 -u jbpm -pjbpmpassword
After this, We can just forget about firewall, network routing, MySQL permission issues incase our persistence not work. For MySQL related document http://dev.mysql.com/doc/refman/5.0/en/connecting.html
Login to server on GUVNOR_IP and place a copy of jbpm-install and start the installation:
# Set our GUVNOR_JBOSS to this example path
export GUVNOR_JBOSS=/opt/guvnor_jboss
echo $GUVNOR_JBOSS

# Go to JBPM_INSTALL directory
cd /opt/download/
unzip jbpm-5.3.0.Final-installer-full.zip
cd /opt/download/jbpm-installer

# Extract a clean copy of jboss application server. To move to /opt we need root permission.
unzip lib/jboss-as-7.0.2.Final.zip
sudo mv jboss-as-7.0.2.Final $GUVNOR_JBOSS

# Copy guvnor, designer, form-builder
cp lib/guvnor-distribution-wars-5.4.0-20120516.war $GUVNOR_JBOSS/drools-guvnor.war
cp lib/designer-2.2.Final-jboss7.war $GUVNOR_JBOSS/designer.war
cp lib/jbpm-5.3.0.Final-form-builder.war $GUVNOR_JBOSS/jbpm-form-builder.war

# And their configurations file
cp conf/guvnor.preferences.properties $GUVNOR_JBOSS/preferences.properties
cp auth/users.properties $GUVNOR_JBOSS/
cp auth/roles.properties $GUVNOR_JBOSS/

cd $GUVNOR_JBOSS
Step 4.2: Jboss configuration.
# Change GUVNOR_JBOSS/standalone/configuration/standalone.xml to bind to GUVNOR_IP. For example
<interfaces>
     <interface name="management">
          <inet-address value="${jboss.bind.address.management:192.168.140.39}"/>
     </interface>
     <interface name="public">
          <inet-address value="${jboss.bind.address:192.168.140.39}"/>
     </interface>
</interfaces>
Step 4.3: drools-guvnor configuration
...
#Designer configuration
designer.url=http://192.168.140.39:8080
#Do not change this unless you know what are you doing
designer.context=designer
designer.profile=jbpm

#FormBuilder configuration
#Do not change this unless you know what are you doing
formbuilder.url=http://192.168.140.39:8080
formbuilder.context=jbpm-form-builder
formbuilder.profile=guvnor
b. Place a copy of GUVNOR_JBOSS/preferences.properties to drools-guvnor.war/target/WEB-INF/classes/preferences.properties
# User your favorist archive manager.
Using "Open with Archive Manager" in Ubuntu Linux
Step 4.4: Deploy and verify drools-guvnor component installation
a. Deploy drools-guvnor
# Set our GUVNOR_JBOSS to this example path
export GUVNOR_JBOSS=/opt/guvnor_jboss
cd $GUVNOR_JBOSS

# Deploy drools-guvnor
cp drools-guvnor.war standalone/deployments/

# Verify drools-guvnor by start GUVNOR_JBOSS
bin/standalone.sh
b. Verify that we have the following message in the console
...
11:55:46,779 INFO  [org.jboss.web] (MSC service thread 1-2) registering web context: /drools-guvnor
11:55:46,844 INFO  [org.jboss.as.server.controller] (DeploymentScanner-threads - 2) Deployed "drools-guvnor.war
c. Verify that we can access the drools-guvnor
Access the http://GUVNOR_IP:8080/drools-guvnor (In our example is http://192.168.140.39:8080/drools-guvnor) with the browser from GUVNOR_IP and CONSOLE_IP
Step 4.5: Deploy designer
a. Apply the change for Designer as following article http://bpmgeek.com/blog/making-jbpm5-work-remote-host
Lock for the section "Saving and reloading process in designer could cause failures" at the end of that post, we need to make following change:
<externalloadurl protocol="http" host="GUVNOR_IP:8080" subdomain="drools-guvnor/org.drools.guvnor.Guvnor/oryxeditor" usr="admin" pwd="admin"/>
In our example
<externalloadurl protocol="http" host="192.168.140.39:8080" subdomain="drools-guvnor/org.drools.guvnor.Guvnor/oryxeditor" usr="admin" pwd="admin"/>
b. Deploy designer
Simple by copy to jboss deployment directory, or with our example in Linux
# Set our GUVNOR_JBOSS to this example path
export GUVNOR_JBOSS=/opt/guvnor_jboss
cd $GUVNOR_JBOSS

# Deploy designer
cp designer.war standalone/deployments/
c. Verify designer
Start jboss and verify that we have something like this
09:47:56,841 INFO  [org.jboss.as.server.controller] (DeploymentScanner-threads - 2) Deployed "designer.war"
09:47:56,841 INFO  [org.jboss.as.server.controller] (DeploymentScanner-threads - 2) Deployed "drools-guvnor.war"
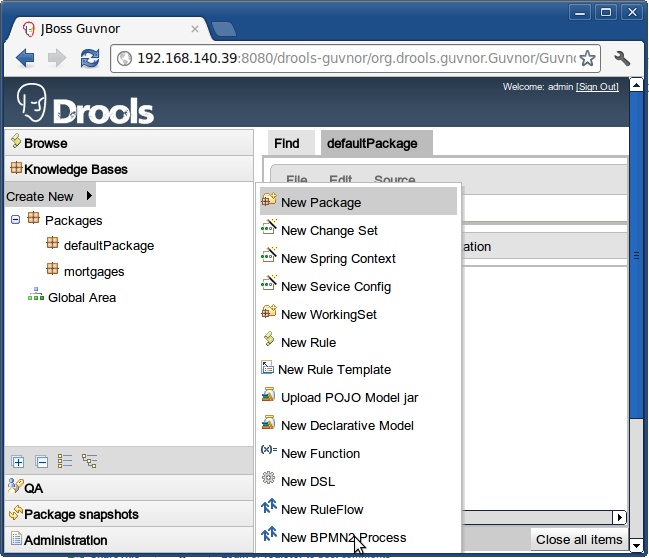
https://community.jboss.org/servlet/JiveServlet/downloadImage/19266/Screenshot.png
Figure 02: Verify designer installation
User your browser to connect to http://GUVNOR_IP:8080/drools-guvnor (or http://192.168.140.39:8080/drools-guvnor in our example), on Left side bar, select "Knowledge Base" \ "Packages" , then select "Create New" \ "New BPMN2 Process" as Figure 02 above, note that if you can create/edit and save your process.
a. Add users/roles configuration to GUVNOR_JBOSS
# Set our GUVNOR_JBOSS to this example path
export GUVNOR_JBOSS=/opt/guvnor_jboss
cd $GUVNOR_JBOSS

cp users.properties standalone/configuration/
cp roles.properties standalone/configuration/
b. Add security domain for jbpm-form-builder in file standalone/configuration/standalone.xml
<subsystem xmlns="urn:jboss:domain:security:1.0">
   <security-domains>
..
      <security-domain name="jbpm-form-builder" cache-type="default">
              <authentication>
                  <login-module code="UsersRoles" flag="required">
                      <module-option name="usersProperties" value="${jboss.server.config.dir}/users.properties"/>
                      <module-option name="rolesProperties" value="${jboss.server.config.dir}/roles.properties"/>
                  </login-module>
              </authentication>
      </security-domain>
..
   </security-domains>
</subsystem>
Using your current Archive Manager to add users.properties and roles.properties to jbpm-form-builder.war/WEB-INF/classes
cp jbpm-form-builder.war standalone/deployments/

# Start GUVNOR_JBOSS
bin/standalone.sh
e. Verify that you have
10:36:52,907 INFO [org.jboss.as.server.controller] (DeploymentScanner-threads - 2) Deployed "drools-guvnor.war"
And use your browser to verify that http://GUVNOR_IP:8080/jbpm-form-builder (http://192.168.140.39:8080/jbpm-form-builder) works.
5. Task-Service or Human Task deployment (with verify).
Login to server on HUMAN_TASK_IP and place a copy of jbpm-install and start the installation:
# Set our HUMAN_TASK_JBOSS to this example path
export HUMAN_TASK_JBOSS=/opt/human_task_jboss
echo $HUMAN_TASK_JBOSS

# Go to JBPM_INSTALL directory
cd /opt/download/
unzip jbpm-5.3.0.Final-installer-full.zip
cd /opt/download/jbpm-installer

# Extract a clean copy of jboss application server. To move to /opt we need root permission.
unzip lib/jboss-as-7.0.2.Final.zip
sudo mv jboss-as-7.0.2.Final $HUMAN_TASK_JBOSS

# And jbpm transactin manager library
cp jbpm-tm.jar $HUMAN_TASK_JBOSS/

# Task persistence.xml
cp task-service/resources/war/persistence.xml $HUMAN_TASK_JBOSS/

# MySQL module configuration
cp db/driver_jar_module.xml $HUMAN_TASK_JBOSS/module.xml

cd $HUMAN_TASK_JBOSS
Step 5.2: Copy your custom build human-task
From JBPM_SOURCE/jbpm-human-task/jbpm-human-task-war/target
To $HUMAN_TASK_JBOSS/jbpm-human-task-war.war
Step 5.3: Jboss standalone.xml configuration
Change HUMAN_TASK_JBOSS/standalone/configuration/standalone.xml as following
a. Remove pojo module
<extension module="org.jboss.as.osgi"/>
<!-- Remove this line extension module="org.jboss.as.pojo"/-->
<extension module="org.jboss.as.remoting"/>
And
<subsystem xmlns="urn:jboss:domain:naming:1.0" />
<!--subsystem xmlns="urn:jboss:domain:pojo:1.0" /-->
<subsystem xmlns="urn:jboss:domain:osgi:1.0" activation="lazy">
b. Change port for management interface.
<management-interfaces>
<native-interface interface="management" port="10099" />
<http-interface interface="management" port="10090"/>
</management-interfaces>
c. Add datasource for task-service
<subsystem xmlns="urn:jboss:domain:datasources:1.0">
<datasources>
<datasource jndi-name="java:jboss/datasources/taskDS" pool-name="MysqlTaskDSPool" enabled="true" jta="true" use-java-context="true" use-ccm="true">
<connection-url>
jdbc:mysql://192.168.140.39:3306/task
</connection-url>
<driver>
mysql
</driver>
<pool>
<prefill>
false
</prefill>
<use-strict-min>
false
</use-strict-min>
<flush-strategy>
FailingConnectionOnly
</flush-strategy>
</pool>
<security>
<user-name>
task
</user-name>
<password>
taskpassword
</password>
</security>
</datasource>
<drivers>
<driver name="mysql" module="com.mysql">
<xa-datasource-class>
com.mysql.jdbc.jdbc2.optional.MysqlXADataSource
</xa-datasource-class>
</driver>
</drivers>
</datasources>
</subsystem>
d. Bind to HUMAN_TASK_IP. For example
<interfaces>
     <interface name="management">
          <inet-address value="${jboss.bind.address.management:192.168.140.39}"/>
     </interface>
     <interface name="public">
          <inet-address value="${jboss.bind.address:192.168.140.39}"/>
     </interface>
</interfaces>
e. Set offset-port
For our example to running on the same server as in https://community.jboss.org/wiki/MultipleInstancesOfJBossAS7OnTheSameMachine (Approach#1)
<socket-binding-group name="standard-sockets" default-interface="public" port-offset="100">
Step 5.4: MySQL driver for jboss
a. Create MySQL module directory
mkdir modules/com/mysql
mkdir modules/com/mysql/main
b.Copy module declaration file
cp module.xml modules/com/mysql/main/
c. Download and install mysql driver to jBoss
wget https://repository.jboss.org/nexus/service/local/repositories/central/content/mysql/mysql-connector-java/5.1.18/mysql-connector-java-5.1.18.jar
cp mysql-connector-java-5.1.18.jar modules/com/mysql/main/mysql-connector-java.jar
d. Start your HUMAN_TASK_JBOSS now
bin/standalone.sh
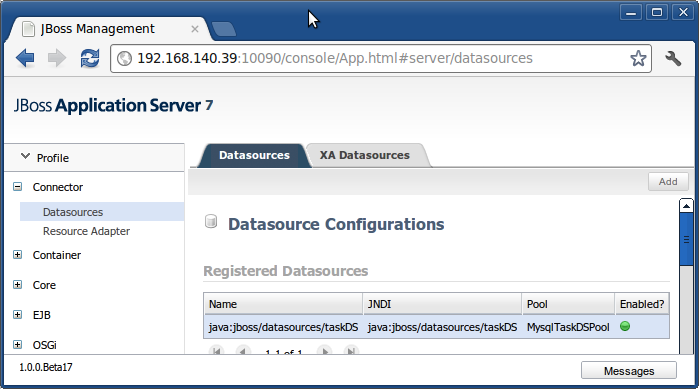
To verify your configuration
https://community.jboss.org/servlet/JiveServlet/downloadImage/19269/human_task_jboss.png Figure 03: Veriry DataSource configuration of HUMAN_TASK_JBOSS
Step 5.4: jbpm-human-task-war.war configuration
a. In your jbpm-human-task-war.war file, make following modification with your current archive manager
Remove WEB-INF/lib/netty-3.2.0.Final.jar
Add jbpm-tm.jar to WEB-INF/lib/
Make HornetQ as active transport
<init-param>
<param-name>active.config</param-name>
<param-value>hornetq</param-value>
</init-param>
Set HornetQ binding address and port (Remember our fix at the end of part 2) to HUMAN_TASK_IP and HORNETQ_PORT
<init-param>
<param-name>hornetq.host</param-name>
<param-value>192.168.140.39</param-value>
</init-param>
<init-param>
<param-name>hornetq.port</param-name>
<param-value>1234</param-value>
</init-param>
Optional: Task service persistence unit name, we will use default value so you can keep it blank
<init-param>
<param-name>task.persistence.unit</param-name>
<param-value>org.jbpm.task</param-value>
</init-param>
User demo user/group call-back implementation
<init-param>
<param-name>user.group.callback.class</param-name>
<param-value>org.jbpm.task.service.DefaultUserGroupCallbackImpl</param-value>
</init-param>
Using demo user and group provider
<init-param>
<param-name>load.groups</param-name>
<param-value>classpath:/org/jbpm/task/servlet/SampleGroups.mvel</param-value>
</init-param>
Look at attachement for the file jbpm_human_task_web.xml, a full copy of our example jbpm-human-task-war/WEB-INF/web.xml
Change jbpmDS to taskDS
<non-jta-data-source>java:jboss/datasources/taskDS</non-jta-data-source>
Modify properties to your MySQL_IP and MySQL_PORT
<properties>
    <property name="hibernate.dialect" value="org.hibernate.dialect.MySQLDialect"/>
    <property name="hibernate.connection.driver_class" value="com.mysql.jdbc.Driver"/>
    <property name="hibernate.connection.url" value="jdbc:mysql://MySQL_IP:MySQL_PORT/task" />
    <property name="hibernate.connection.username" value="task"/>
    <property name="hibernate.connection.password" value="taskpassword"/>
    <property name="hibernate.connection.autocommit" value="false" />
    <property name="hibernate.max_fetch_depth" value="3"/>
    <property name="hibernate.hbm2ddl.auto" value="create" />
    <property name="hibernate.show_sql" value="true" />
</properties>
In our example:
<properties>
    <property name="hibernate.dialect" value="org.hibernate.dialect.MySQLDialect"/>
    <property name="hibernate.connection.driver_class" value="com.mysql.jdbc.Driver"/>
    <property name="hibernate.connection.url" value="jdbc:mysql://192.168.140.39:3306/task" />
    <property name="hibernate.connection.username" value="task"/>
    <property name="hibernate.connection.password" value="taskpassword"/>
    <property name="hibernate.connection.autocommit" value="false" />
    <property name="hibernate.max_fetch_depth" value="3"/>
    <property name="hibernate.hbm2ddl.auto" value="create" />
    <property name="hibernate.show_sql" value="true" />
</properties>
Look at attachment for the file jbpm_human_task_persistence.xml, a full copy of our example jbpm-human-task-war/WEB-INF/classes/META-INF/persistence.xml
With the modified persistence.xml in the Step c above.
b. Place a copy of HUMAN_TASK_JBOSS
6. jBPM-Console deployment (with verify).