
7:09 a.m.
Max Rydahl Andersen [https://community.jboss.org/people/maxandersen] modified the blog
post:
"Debugging and Browsing OpenShift Applications in Eclipse"
To view the blog post, visit:
https://community.jboss.org/community/tools/blog/2012/02/08/debugging-and...
--------------------------------------------------------------
Latest OpenShift enabled port-forwarding for your OpenShift applications.
This enables you to use a debugger for your JBoss application and it allows you to connect
to the database directly and use tools like Eclipse Database Browser instead of only using
phpsqlmyadmin.
Of course once you have these things setup in your Eclipse you can use things like reverse
engineering and even run your local app against the remote database.
It all works by setting up an ssh tunnel that exposes the internal remote ports running on
OpenShift servers on your local machine - this does require some manual steps which
i'm outlining in this blog
together with how to configure the database setup in Eclipse and how to remote debug JBoss
running on OpenShift.
In future releases of JBoss Tools we'll be looking at simplifying these steps, but for
now here are the fully manual steps.
h1. Setting up port forward
The simplest way to do this is to use the rhc command line tools.
Make sure you got the latest version - how to install/update these for various platforms
is documented https://openshift.redhat.com/app/express#quickstart here.
Once you have those run rhc-port-forward -a <appname>.
I have an app called ‘fonk’ of type ‘jboss-as7’ and with ‘mysql’ cartridge enabled. For
such a setup you should see something like this:
rhc-port-forward -a fonk
Password:
Checking available ports...
Binding httpd -> 127.1.255.130:8080...
Binding java -> 127.1.255.129:8080...
Binding mysqld -> 127.1.255.129:3306...
Use ctl + c to stop
h1. OSX gotcha
In case you get an error print out similar to this:
bind: Can't assign requested address
channel_setup_fwd_listener: cannot listen to port: 3306
bind: Can't assign requested address
channel_setup_fwd_listener: cannot listen to port: 8080
bind: Can't assign requested address
channel_setup_fwd_listener: cannot listen to port: 8080
Could not request local forwarding.
You are most likely running OS X which unfortunately(?) does not automatically allow you
to have all 127.x.x.x IP’s setup with a so called loopback alias.
To fix this you need to add such alias manually for each IP you want to connect to.
In my case that is 127.1.255.130 and 127.1.255.129 as seen in the first attempt of using
rhc-port-forward. These IP’s will be different for each of your app, thus for `fonk’ app I
enable loopback aliases by running the following:
sudo ifconfig lo0 alias 127.1.255.130
sudo ifconfig lo0 alias 127.1.255.129
Now when you run rhc-port-forward you should not be seeing any bind: Can't assign
requested address. error messages.
Note: these alias’es does not survive reboots - if anyone know how to setup global
loopback alias or make these persistent between reboots then I would love to hear about
that in the comments :)
h1. Use OpenShift database locally
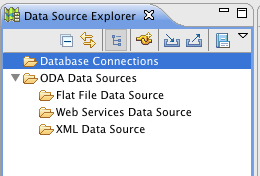
When port forwarding is enabled you can start using these, for example to setup and
connect to MySql database via Eclipse DTP Tools.
To do this open the Data Source Explorer:
https://community.jboss.org/servlet/JiveServlet/showImage/38-4525-17933/d...
https://community.jboss.org/servlet/JiveServlet/downloadImage/38-4525-179...
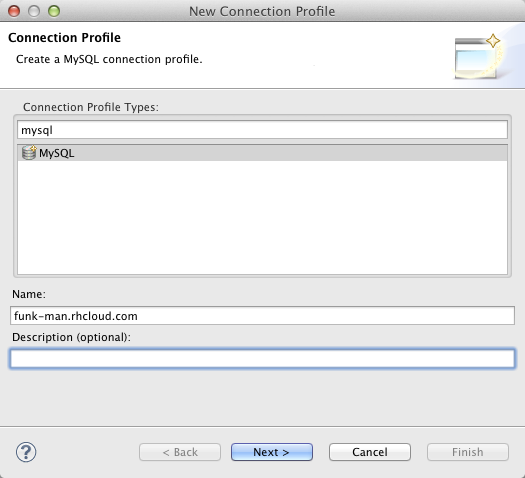
Click on the “New Connection Profile” and choose MySql and give it a name.
https://community.jboss.org/servlet/JiveServlet/showImage/38-4525-17934/n...
https://community.jboss.org/servlet/JiveServlet/downloadImage/38-4525-179...
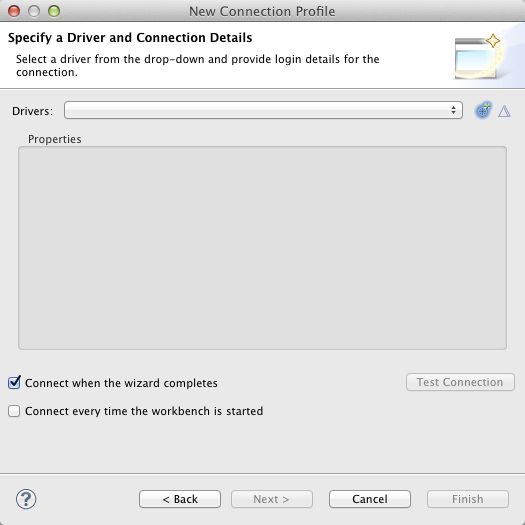
Click Next and if you do not have an existing driver for MySQL configured you will see an
empty list:
https://community.jboss.org/servlet/JiveServlet/showImage/38-4525-17935/e...
https://community.jboss.org/servlet/JiveServlet/downloadImage/38-4525-179...
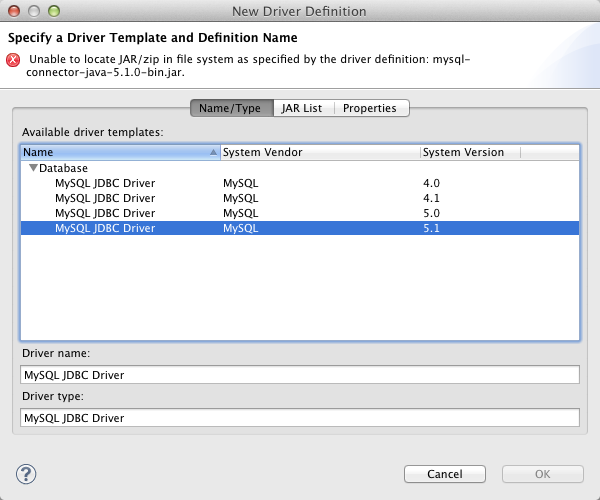
To add a driver click the + icon and setup a driver:
https://community.jboss.org/servlet/JiveServlet/showImage/38-4525-17936/m...
https://community.jboss.org/servlet/JiveServlet/downloadImage/38-4525-179...
For OpenShift MySQL the 5.1 option is best, and it just needs to be told where the driver
is under the “Jar List” tab. Here you click the “Edit JAR/Zip” and point it to your
downloaded mysql-connectoer-java-5.1.jar.
https://community.jboss.org/servlet/JiveServlet/showImage/38-4525-17937/e...
https://community.jboss.org/servlet/JiveServlet/downloadImage/38-4525-179...
Once that is done you just need to fill in the right connection details:
https://community.jboss.org/servlet/JiveServlet/showImage/38-4525-17938/c...
https://community.jboss.org/servlet/JiveServlet/downloadImage/38-4525-179...
The important part for the connection details is that you set URL to match the pattern:
jdbc:mysql://<forwarded-ip>:3306/<appname>
For my fonk application that would be:
jdbc:mysql://127.1.255.129.3306/fonk
And then set “User Name” to admin and type in your MySql password.
You can use the “Test Connection” button to verify you can connect.
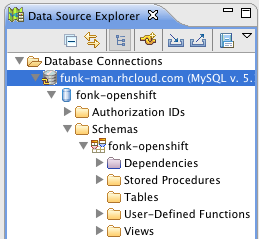
When you press Finish you should be able to browse your remote mysql database hosted on
OpenShift:
https://community.jboss.org/servlet/JiveServlet/showImage/38-4525-17940/d...
https://community.jboss.org/servlet/JiveServlet/downloadImage/38-4525-179...
From here on out you can now use this Eclipse dataconnection with any
plugin that supports such connections. i.e. Hibernate Tools reverse engineering features.
h1. Debug JBoss AS
To enable debug with JBoss we need to add a enable_jpda marker file to
.openshift/markers.
This is done by simply executing the following:
cd git/fonk
touch .openshift/markers/enable_jpda
git add .openshit/markers/enable_jpda
git commit -a -m "enable jpda"
[master 6f7197c] enable jpda
0 files changed, 0 insertions(+), 0 deletions(-)
create mode 100644 .openshift/markers/enable_jpda
git push
<openshift remote build output>
Note: you can of course also do this all from within Eclipse via EGit integration if you
prefer that.
When this have been enabled you need to start/restart port-forwarding to get it to pick up
the java jpda port.
rhc-port-forward -a fonk
Password:
Checking available ports...
Binding httpd -> 127.1.255.130:8080...
Binding java -> 127.1.255.129:8080...
Binding java -> 127.1.255.129:8787...
Binding mysqld -> 127.1.255.129:3306...
Use ctl + c to stop
Notice the Binding java -> 127.1.255.129:8787.... line, that is the jpda ip and port
you are going to use.
Now to set this up in Eclipse JDT debugger you need to create a ‘Remote Java Application’
under “Debug Configurations”
https://community.jboss.org/servlet/JiveServlet/showImage/38-4525-17941/d...
https://community.jboss.org/servlet/JiveServlet/downloadImage/38-4525-179...
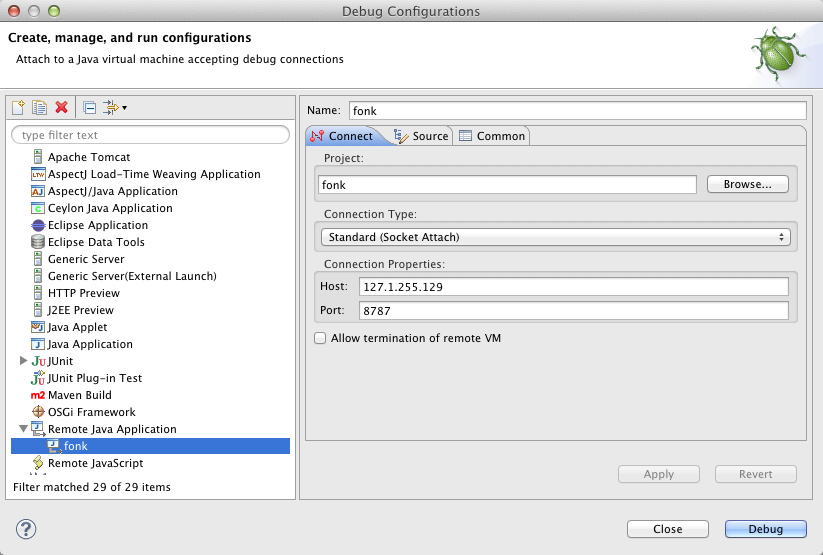
And here you select ‘Remote Java Application’ and fill in the connection details:
https://community.jboss.org/servlet/JiveServlet/showImage/38-4525-17944/s...
https://community.jboss.org/servlet/JiveServlet/downloadImage/38-4525-179...
The important pieces here are to set Host: to the ip number (in my case 127.1.255.129) and
the port wich for JBoss AS on OpenShift is 8787 by default.
The Project part is optional, but its useful to point it to the matching Eclipse project
which will allow it to find the proper source and let you place breakpoints.
Once you press “Debug” it should go and connect to the running server. It might take a
while, it is after all going into the Cloud :)
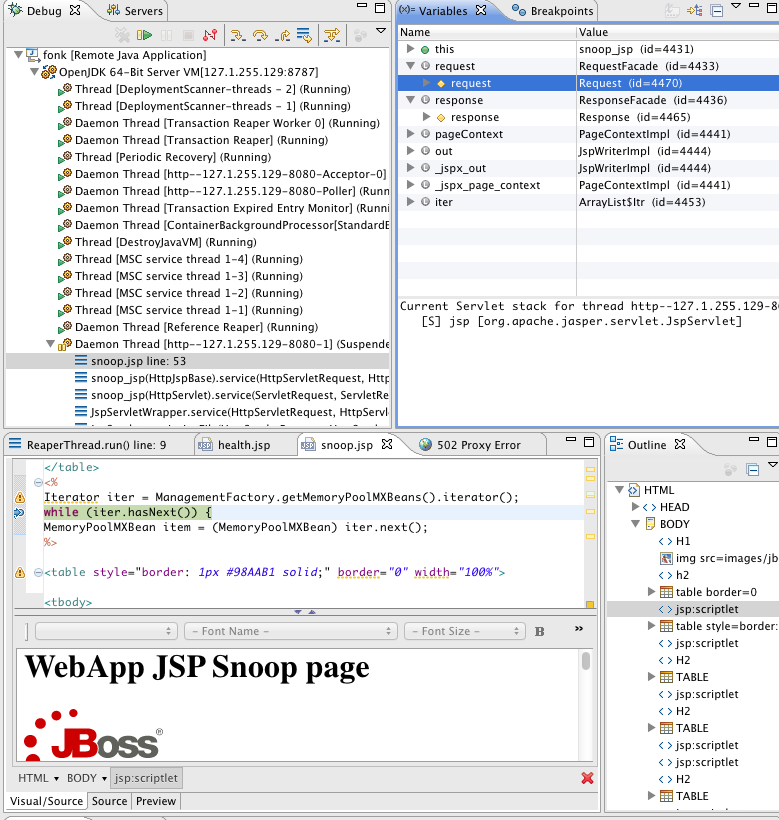
And if you now set breakpoints and use a browser to trigger them you get something like
this:
https://community.jboss.org/servlet/JiveServlet/showImage/38-4525-17943/d...
https://community.jboss.org/servlet/JiveServlet/downloadImage/38-4525-179...
This showing the remote debugger hitting the breapoint in a jsp page named snoop.jsp.
h1. Conclusion
I hope I showed you how powerful OpenShift’s latest release with port-forwarding is and
how (fairly) easy it is to setup once you get the port-forwarding working.
Being able to connect directly to the remote database and debug you JBoss server makes for
a whole new world of possibilities and productivity boost with OpenShift.
Hope you like it and continues to have fun exploring OpenShift and JBoss Tools.
/max
--------------------------------------------------------------
Comment by going to Community
[https://community.jboss.org/community/tools/blog/2012/02/08/debugging-and...]
5172
days inactive
5172
days old
0 comments
1 participants
participants (1)
-
 Max Rydahl Andersen